Sometimes you have to fall in problems like, you installed a program on your Windows PC and right after the installation, the PC or Windows started to behave abnormally just because of that program or you just misconfigured a setting in Windows and now the Windows isn’t working properly and you can’t go back to previous state. Or just now your system is infected by virus or malware for some reason and you wish you could go back to the earlier working point when your PC was clean. To help users combat against these kinds of problems, Microsoft introduced a cool feature called “System Restore” starting from Windows ME in 2000. Later they have continued to add and improve this Time Machine like feature in Windows XP, 7, 8.x and today’s Windows 10.
What is System Restore
![]() System Restore is a user configurable feature in Windows that can help Windows to restore its system files and configurations to a certain previous state. To go to an earlier system state it must have a Restore Point of that time. By default Windows will automatically create a Restore Point in every seven days. System Restore points are also auto created when your are about to install a complicated software or driver that may affect system files. Creating and restoring a System Restore point doesn’t affect your personal files like photos, videos, emails or documents. Thus if you accidentally crashed your Windows at some point by installing a driver or deleting a system file or misconfiguring something, you can use System Restore to bring your Windows to a previous working state. You can also System Restore from a previously created system image backup stored on hard drive.
System Restore is a user configurable feature in Windows that can help Windows to restore its system files and configurations to a certain previous state. To go to an earlier system state it must have a Restore Point of that time. By default Windows will automatically create a Restore Point in every seven days. System Restore points are also auto created when your are about to install a complicated software or driver that may affect system files. Creating and restoring a System Restore point doesn’t affect your personal files like photos, videos, emails or documents. Thus if you accidentally crashed your Windows at some point by installing a driver or deleting a system file or misconfiguring something, you can use System Restore to bring your Windows to a previous working state. You can also System Restore from a previously created system image backup stored on hard drive.
How System Restore works
System Restore uses a feature called System Protection. When System Protection is turned on, Windows will automatically create Restore Points that contain information about Windows configuration, registry settings, program files, etc. You can also manually create a Restore Point of any time. Thus, a Restore Point is simply a representation of a stored state of system files of a certain time. It’s always a good practice to manually create System Restore point before you do something critical.
How to Create a System Restore Point in Windows 10, 8.x, 7 and Vista
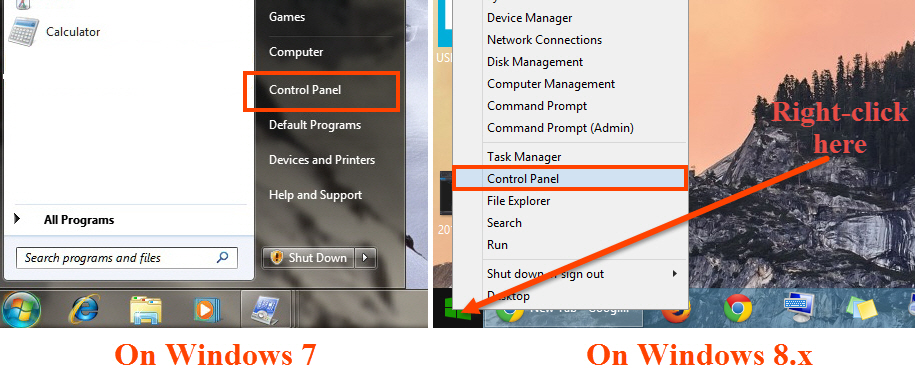
1. On Windows 7 and Vista, click on Start Menu and then hit Control Panel. On Windows 8.x Right-click on bottom-left corner (where start button used to appear) and choose Control Panel.
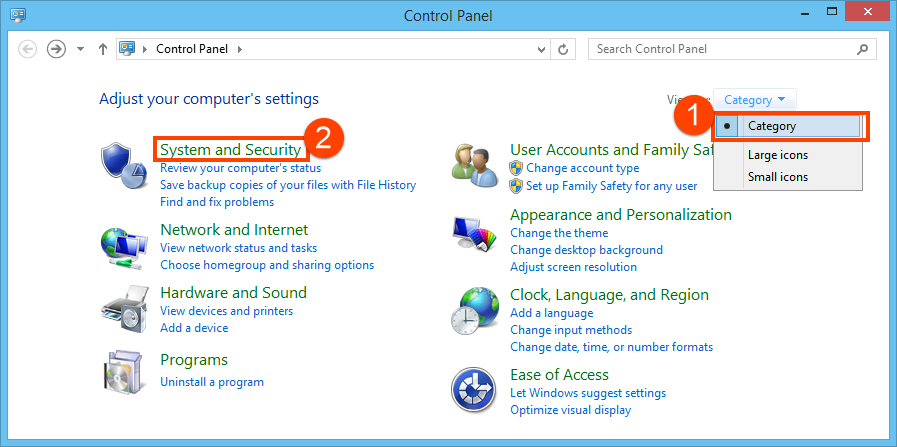
2. In Control Panel window, choose System and Security. You can make Control Panel ‘view by category’ to easily find the setting.
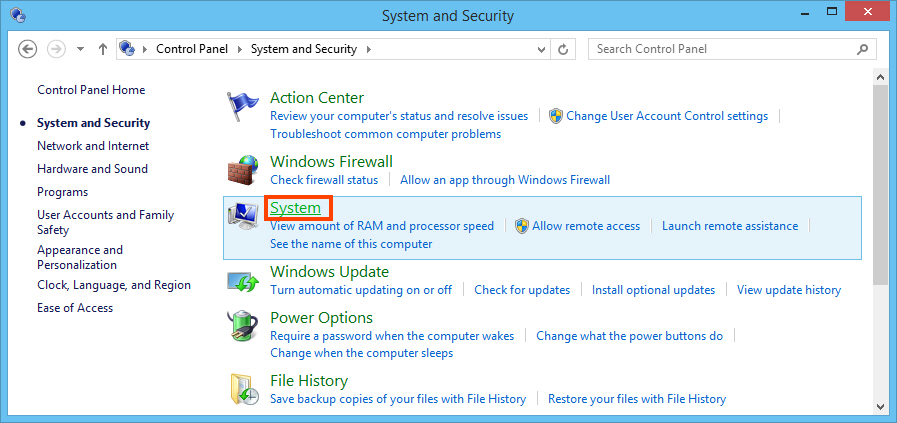
3. In System and Security window, click on System.
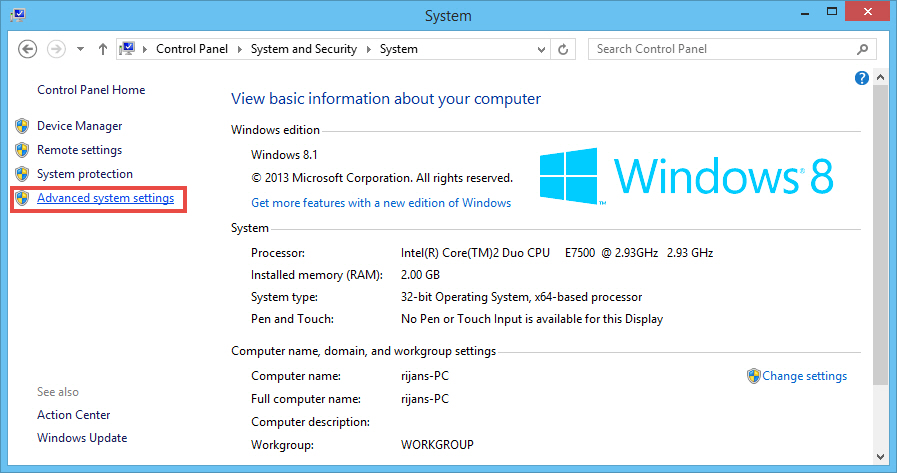
4. Choose Advanced system settings from left side in System window.
5. Go to System Protection tab in System Properties window. Here, before proceeding, make sure Protection is turned on for System drive (most of the time it’s C drive). If protection isn’t turned on for the system drive, first select it and then click Configure. In Configure window, you will have option to turn off System Protection and allocate more or less memory.
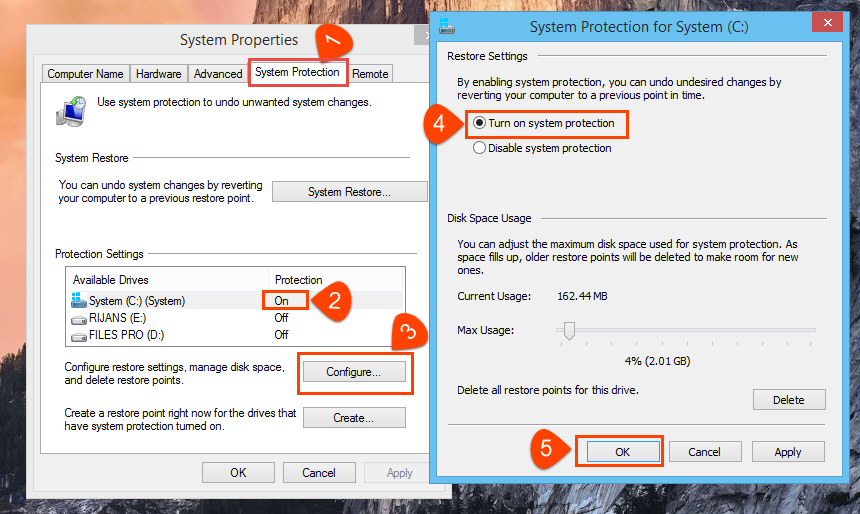
Note: In Configuration, the more memory you allocate, the more numbers of restore points can be stored. Windows deletes old restore points when it exceeds memory allocation.
5. Hit the Create button.
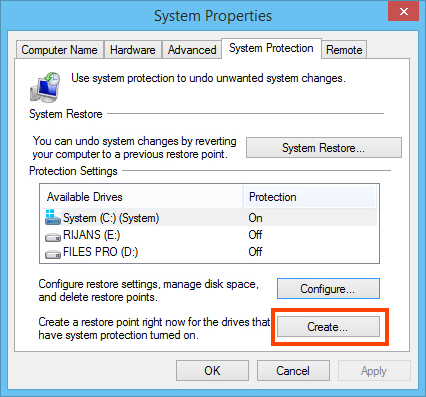
6. Clicking Create button will bring a Restore Point creation window. Input any name you want to give the restore point. Then hit Create.

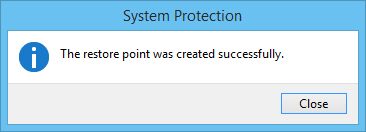
7. Within one or two minutes, you should see a confirmation message stating that the restore point was created successfully.
This is how you can easily create a system restore point on Windows 7 and 8.x. Proceed to follow Windows XP guide and how to restore Restore Points.
How to Create a System Restore Point in Windows XP
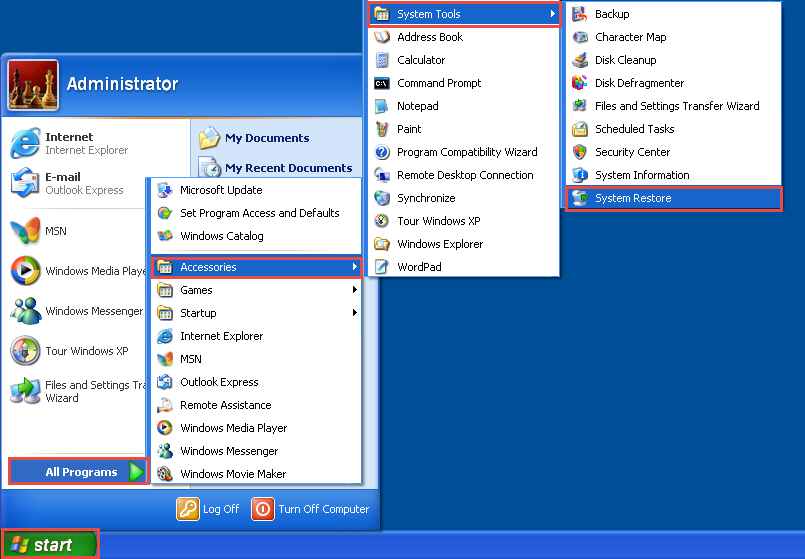
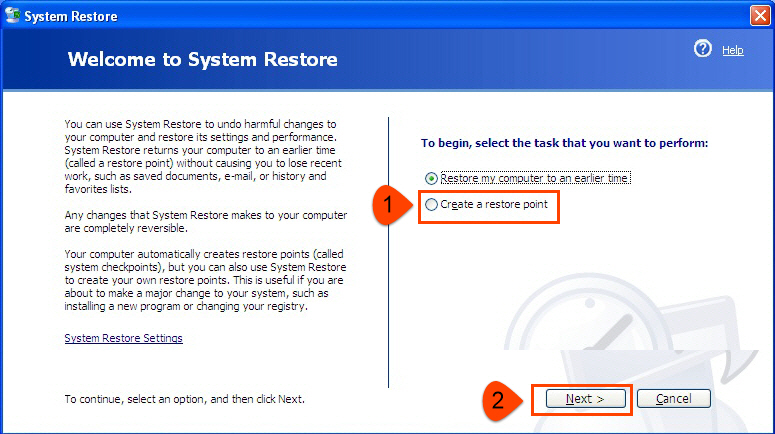
1. On Windows XP, click on Start Menu and go this way: Accessories > System Tools > System Restore.
2. In system restore window, choose Create a restore point and then click Next.
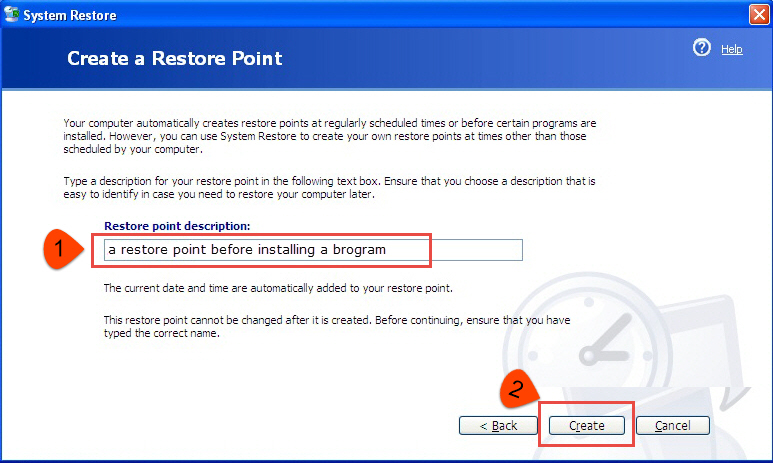
3. Give it a name and click Create.
Done.
How to Restore a Restore Point in Windows 10, 8.x, 7 and Vista
1. Repeat the steps up to step 5 in Restore Point creation guide.
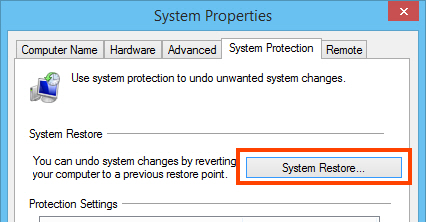
2. In System Protection tab in System Properties window, click on System Restore button.
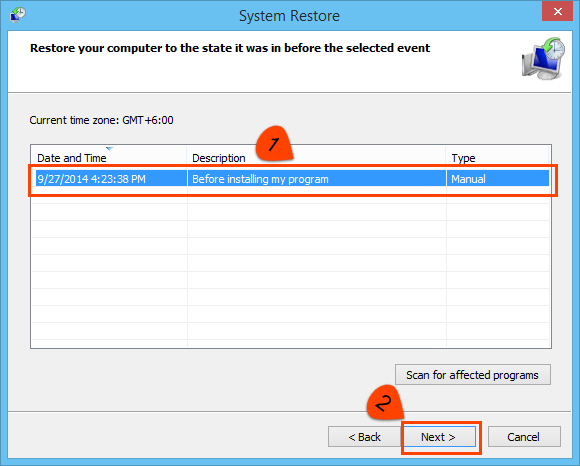
3. Click Next in wizard window. You should be presented with a window containing list of Restore Points with date. Select the restore point you want to restore to. Then click Next. There’s an option to scan for affected programs. You can use it to look for which programs would be affected.
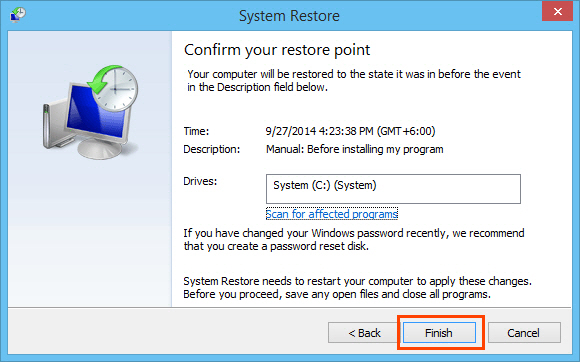
4. Review your steps, in confirmation window, click Finish.
5. After proceeding, system restoration will start with a system restart. After successful restoration, you should see a confirmation message like following:
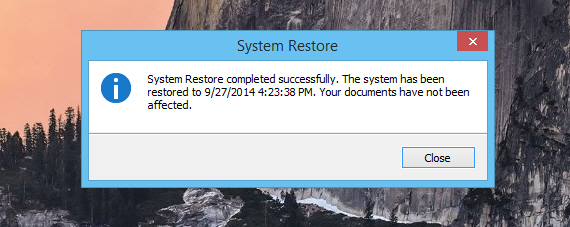
You are done restoring your PC.
Restore a Restore Point in Windows XP
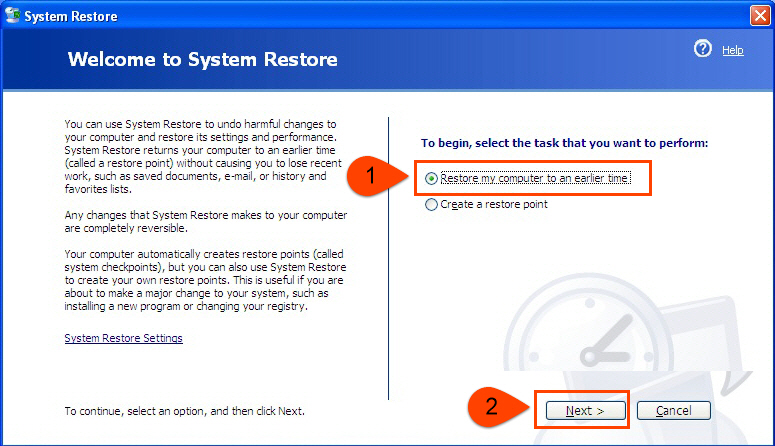
1. As before, click on Start Menu and go this way: Accessories > System Tools > System Restore.
2. Choose Restore my computer to an earlier time then click Next.
3. Select your restoration point and click Next. On confirmation windows, click Next.
4. After successful restoration with a restart, you should see the following message:

That’s it.
How to Undo a System Restoration (Windows 7, 8.x, Vista and XP)
Now that you have restored your system to a previous state and something got broken or you have fallen in further big problem. You might want to undo your system restoration.
Note: If you restored a restore point in safe mode, you can’t undo it.
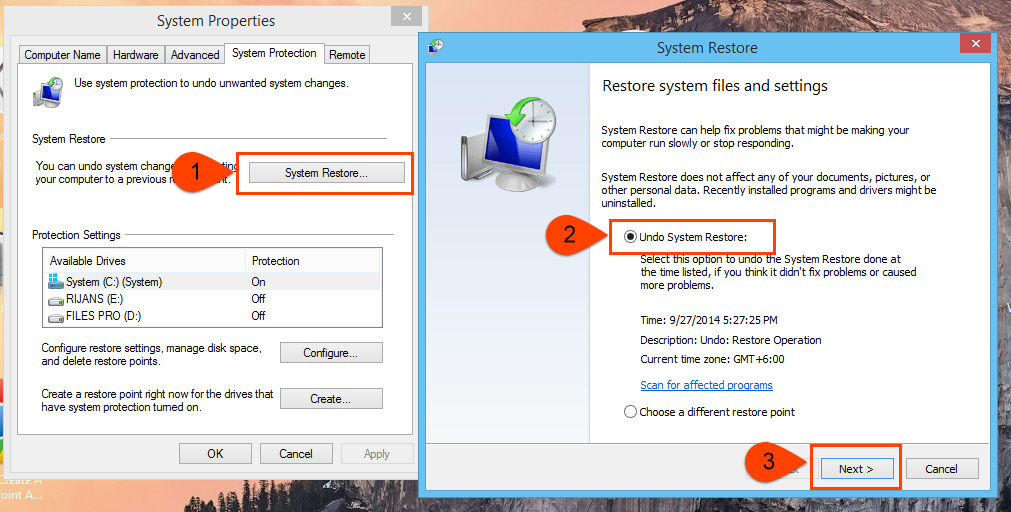
- On Windows 7, Vista and 8.x, in System Protection tab, click System Restore and then Undo System Restore. Then click Next.
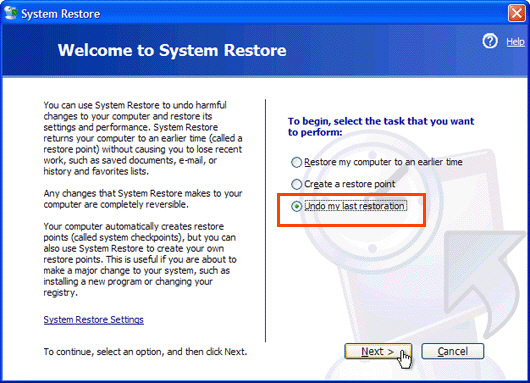
- On Windows XP, access System Restore window using previous XP guide. If you recently did a restoration, you will get an option like Undo my last restoration. Click Next after choosing it.
Proceed with reviewing steps.
Verdict
It’s no doubt that System Protection feature is an innovative thing in Windows. It helps anyone to make a restore point before installing any harsh software so that he or she can go back to previous state if the system gets compromised. Even if you didn’t create a restore point yourself, you still have hope that Windows may have automatically created a restore point.
Author: Jaber Al Nahian
Jaber is a Programmer and Tech Enthusiast Geek from Dhaka, Bangladesh. He is the founder and Chief-Editor of TechGainer. While he is away from his keyboard, either he's fishing or messing with wildlife. In case, you can contact him at rijans[at]techgainer[dot]com.
Wow, wonderful blog layout! How long have you been blogging
for? you make blogging look easy. The overall look of
your website is great, as well as the content!
Thanks for finally writing about >How to Create a System
Restore Point in Windows 10, 8, 7 and XP | TechGainer <Liked it! https://parbriz.net/parbriz.php?marca=Volkswagen&model=Passat&step2=modelul_auto
This is my first time visit at here and i am in fact impressed to read everthing
at one place. https://parbrize-la-domiciliu.ro/index.php?p=parbrize&m=Mazda&f=mazda.jpg&alt=Parbriz
Very rapidly this website will be famous amid all blog visitors, due to it’s good articles or reviews
Excellent beat ! I wish to apprentice while you amend your website, how could i subscribe
for a weblog website? The account helped me a acceptable deal.
I were tiny bit familiar of this your broadcast offered vivid transparent concept
Hi, its nice paragraph about media print, we all be familiar with media
is a wonderful source of facts.
Hello there there Excellent Blog you possess on this page, it is like you place plenty of operate in it.
Im just looking at some Blog to get motivation for my Site.
I offer Bongs available for sale, and also a great
Local community on my small page. If you’re thinking about Bongs on the market, or perhaps a Bong
Onlineshop, you should verify me out and leave us a article.
br, Moe
whoah this blog is fantastic i like studying your posts.
Stay up the good work! You understand, lots of individuals are looking around for this info,
you could aid them greatly.
Greetings from Colorado! I’m bored to tears at work so I decided
to check out your website on my iphone during lunch
break. I love the knowledge you present here and can’t wait to take a
look when I get home. I’m surprised at how fast your blog loaded
on my mobile .. I’m not even using WIFI, just 3G ..
Anyways, awesome blog! https://parbriz.net/parbriz.php?marca=Hyundai&model=Tucson&step2=modelul_auto
Wow! Thank you! I continually needed to write on my site something like that.
Can I take a fragment of your post to my website?
Check out my homepage – office clearance services London
I’ve been exploring for a bit for any high quality articles or blog posts in this sort of area .
Exploring in Yahoo I ultimately stumbled upon this site.
Reading this info So i’m happy to show that I’ve an incredibly good uncanny feeling I came upon exactly what I needed.
I so much for sure will make certain to do not disregard this
web site and provides it a look on a continuing basis.
Does your site have a contact page? I’m having trouble
locating it but, I’d like to send you an e-mail.
I’ve got some recommendations for your blog you might be interested
in hearing. Either way, great blog and I look forward to seeing it improve over time.
Bán clone trắng , bán clone US – Verify Mail – 2FA ,bán clone EU – Verify Mail – 2FA , bán clone 1 friend , bán clone 1 friend + avatar : http://clonevia.com
Hello, I would like to subscribe for this weblog to obtain latest updates, so where can i do
it please help out. https://vanzari-parbrize.ro/parbrize/parbrize-daewoo.html
My partner and I stumbled over here coming from a different web address and thought I might as
well check things out. I like what I see so now i am following you.
Look forward to exploring your web page repeatedly.
When i was just regarding to quit, I emerged across your content.
And oh child did I fix my issue! Typically the depth and
knowledge of the topic you have is really rare now! Only https://www.sitejabber.com/reviews/essaypro.com and you appear
to know what a person write about. I can’t stand meaningless content which is definitely not it!
Aw, this was an incredibly nice post. Taking the time and actual effort to create
a good article… but what can I say… I hesitate a lot and never
seem to get anything done.
You complrted sevberal fine points there. I did a search on the matter and found most persns will agree with your blog.
My web site; bespoke slate house signs essex
Good info. Lucky me I ran across your blog by accident (stumbleupon).
I’ve book marked it for later!
Fabulous, what a website it is! This website presents valuable information to us, keep it up.
What’s up to all, for the reason that I am actually eager of reading this webpage’s post to be updated daily.
It carries good material. https://vanzari-parbrize.ro/parbrize/parbrize-maserati.html
[ SEO – BACKLİNK – HACKLİNK – BLACK OR WHİTE HAT ]
– – – – – – – – – – – – – – – –
1- Senin için yorum backlink yapabilirim.
2- I can comment backlink for you.
3- Ich kann den Backlink für Sie kommentieren.
4- Я могу прокомментировать обратную ссылку для вас.
[ SEO – BACKLİNK – HACKLİNK – BLACK OR WHİTE HAT ]
– – – – – – – – – – – – – – – –
WhatsApp = +9 0422 606 06 30
Mail = [email protected]
Google Search = Seo Bayi
seo
I have read some just right stuff here. Certainly value
bookmarking for revisiting. I wonder how a lot effort you set to make this type of fantastic informative website. https://anunturi-parbrize.ro/parbriz-aston_martin-3.html
As I was nearly to give up, I stumbled upon your post. As well
as oh boy did I fix my issue! The intensity as well as understanding
of the topic a person possess is incredibly unusual now!
Just http://www.rtjournal.org/online-jobs-for-students/ as well as you obviously understand
what an individual discuss. I can not stand meaningless content and additionally this will be actually
certainly not this!
Thanks a lot for the article post.Really looking forward to read more. Awesome.
Thank you for the good writeup. It in fact was a amusement account it.
Look advanced to more added agreeable from you! By
the way, how could we communicate? https://vanzari-parbrize.ro/parbrize/parbrize-lancia.html
I used to be able to find good info from your blog articles. https://vanzari-parbrize.ro/parbrize/parbrize-fiat.html
Best https://parbriz-auto-bucuresti.ro/geam-porsche-918.html
I will not even learn how I ended up right here, however I assumed this set up was great.
I don’t realize who you happen to be however definitely you happen to be going
to a famous blogger should you aren’t already.
Cheers!
Here is my webpage; DioneLAnnand
With havin so much content and articles do you ever run into any issues of plagorism or copyright violation? My blog has a lot of unique content I’ve either authored myself or outsourced but it seems a lot of it
is popping it up all over the web without my authorization. Do you know any techniques to help stop content from
being ripped off? I’d genuinely appreciate it.
Greetings! Extremely helpful advice in this article!
It’s the little changes which will make the greatest changes.
Thanks a great deal for sharing!
Here is my web page: SocorroOEber
Hi, I check your blog like every week. Your
story-telling style is awesome, keep doing what you’re doing! https://vanzari-parbrize.ro/lunete/lunete.php
There is evidently a bunch to identify about this. I consider you made various good points in features also.
Hurrah! Eventually I got a webpage where I can actually take useful information regarding my study and data.
Have a look at my homepage … ClarisCErice
I’m extremely inspired with your writing talents and also with the structure for your blog. Is that this a paid topic or did you customize it yourself? Anyway keep up the nice high quality writing, it’s uncommon to look a nice weblog like this one nowadays.
Hey there! I know this is kinda off topic but I was wondering which
blog platform are you using for this site? I’m getting tired of WordPress
because I’ve had issues with hackers and I’m looking at alternatives for another platform.
I would be fantastic if you could point me in the direction of a
good platform. https://anunturi-parbrize.ro/luneta-bentley-5.html
Great post here. One thing I’d like to say is most professional areas consider the Bachelors Degree as the entry level requirement for an online college degree. Though Associate Certifications are a great way to begin, completing your current Bachelors reveals many entrances to various occupations, there are numerous online Bachelor Course Programs available via institutions like The University of Phoenix, Intercontinental University Online and Kaplan. Another issue is that many brick and mortar institutions give Online variations of their college diplomas but generally for a significantly higher price than the companies that specialize in online college diploma programs.
Wonderful work! This is certainly the type of information that will be shared throughout the internet.
Disgrace on Google for not positioning this publish higher!
Come on over and speak with my site . Many thanks =)
Also visit my website … AdriaMLenoir
Great post. https://anunturi-parbrize.ro/index.php?cauta=parbriz+seat
With havin so much written content do you ever run into any issues of plagorism or copyright violation? My blog has a lot of unique
content I’ve either authored myself or outsourced but it looks
like a lot of it is popping it up all over the internet without my authorization. Do you know
any techniques to help prevent content from being ripped
off? I’d genuinely appreciate it.
I’m extremely inspired together with your writing talents as well
as with the layout in your weblog. Is this a paid subject
matter or did you modify it yourself? Anyway stay up the
nice quality writing, it is uncommon to see a great blog like this one today..
Thank you, I have just been searching for info about this subject for a while and yours is the greatest I’ve
discovered so far. However, what in regards to the bottom line?
Are you positive concerning the source?
Wonderful article! We will be linking to this great article on our site. Keep up the great writing.
Inspiring quest there. What occurred after? Take care!
Very rapidly this site will be famous among all
blogging and site-building people, due to it’s fastidious content
Hey there great blog! Does running a blog such as this require a lot of work?
I’ve no knowledge of coding however I was hoping
to start my own blog in the near future. Anyway, if you have
any recommendations or tips for new blog owners please share.
I know this is off subject however I just wanted to ask.
Thanks a lot!
Hi! I just wish to give you a huge thumbs up for the great information you’ve
got right here on this post. I am coming back to your website for
more soon.
Asking questions are genuinely good thing if you are not understanding something entirely, however this post presents pleasant understanding even.
Thanks for sharing your thoughts about humans of science. Regards
Everyone loves it when individuals come together and share opinions.
Great site, continue the good work!
Hi there! Someone in my Facebook group shared this website with
us so I came to check it out. I’m definitely loving the information. I’m bookmarking and will
be tweeting this to my followers! Superb blog and outstanding design and style.
Güzeller güzeli kızlar ile randevulaşmak için hemen nevşehir sitemize bir bakın şimdiden teşekkürlerimizi sunuyoruz.